I am not a secuirity expert and this guide is just meant to be my personal summary of research into authentication. I cannot verify that everything is 100% correct, however, I spent a lot of time wishing I could find an end-to-end guide like this so I hope that you at least find parts of it helpful. This guide is published under an open MIT license.


So this is just an initial attempt, it needs polish and I’d like to put together a more complete example, but here are the basics:
- We have a web app hosted on Azure App Service.
- It consists of a Node.js / Express server that serves up a single page React application, and provides a REST api to our backend.
- We also have an existing Azure Active Directory account filled with our company’s users.
- Now we want to let our employees use their accounts to log into our web app, and restrict their access based on roles that we can set, for now something simple, like viewers and editors (I’m going to refer to them as users and owners but the naming of roles is entirely arbitrary).
This sounds like it should be simple and common enough, but I couldn’t find any guides that covered this workflow from end to end, and went down the wrong path several times along the way, so I thought I’d document what I learned and share it in case anyone else finds it helpful.
0 Overview
To get right into it, skip to step 1.
0.1. How Do We Authenticate With Stateless Servers?
REST APIs built on stateless servers are a very popular design these days, but they raise an interesting problem when it comes to authentication. Previously, it was popular to use sessions, where essentially the back end would create and store a ‘session’ object, that would have all of the logged in user’s information and then return to the user a unique id to identify it, and their browser would store it in a cookie. When the user revisited the page the cookie would be sent and the server could grab the id, find where it stored the session and pass back the information within. The id wasn’t really encrypted or protected and it would be up to the server to make sure that the requests for that session still made sense (it hadn’t been too long, the ip address hadn’t changed, etc.) However when your back end is stateless (i.e. it can’t store any information from request to request, each request / api call is its own independent function call) then you can’t stored a session that’s available from page to page. So how can we handle securely keeping track of information about logged in users as they navigate around the site and enter it from different routes?
0.2 Json Web Tokens To The Rescue

The answer is Json Web Tokens (JWT). This Stack Exchange thread has a decent explanation of the difference between Tokens and Sessions, and there’s a lot of good information about what they are and how they work available elsewhere online. Personally, I found this guide from Academind to be a really practical, hands-on introduction to REST APIs in general, and frequently came back to his discussion of JWTs.
But at a quick and basic level, JWTs are a funky looking string of characters that can be decoded to reveal a plain text json object. The thing that makes them special is that the encoding process cryptographically signs them so that as long as we know the signing key, we can verify that none of the information in them has been tampered with. This is an example of what a JWT looks like on the left, and what it looks like once decoded on the right:
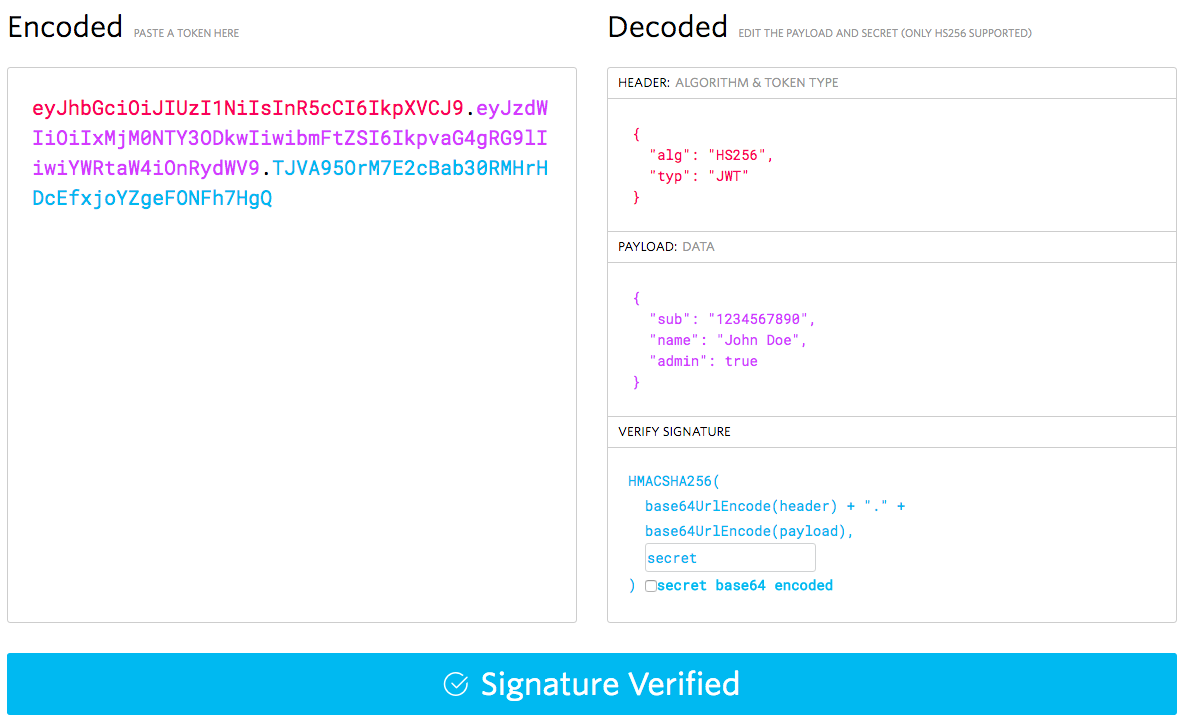
The payload data is what we’re after, and will include our role information, but we also need the header portion to know what algorithm to verify it with, the signature portion to perform the verification, and the “secret” or signing key that it was signed with so that the verification process knows that it wasn’t tampered with.
0.3 Auth Flow

So when it comes to our SPA / API, we want to use what’s called the Implicit Grant authorization flow which should look something like this:
1 Auth Provider (Azure):
- Configure an application registration in our authentication provider’s system (Azure AD).
- Create the roles that we want within our application registration.
- Apply rules to it that govern which users can join it, and what roles they have when joining.
- Provide the ability to remove users and change their roles assignments.
-
Provide a login url for our application to redirect users to when they want to login.
- Return a signed JWT when a user logins succesfully that includes their role information.
- Make the signing key used to encode the JWT available to our back end server via some method so that it our back end can verify the authenticity of the logged in user and their roles before returning data.
2 Frontend (React):
- User clicks “Log In” button in the front end react app, and it redirects them to the Auth Provider’s login site with an attached callback URL that points to a special callback page on our site. Here on the auth site they are prompted to login and on successful login, the Auth Provider should generate a JWT with information about the user, including their roles, and redirect them back to the callback URL of our site with this token and the information about what page they were on beforehand attached.
-
When the callback page is called, it looks for an attached JWT, decodes it and makes it availabe to the rest of the SPA which can use the user’s role information to adjust the UI accordingly. It likely also caches the token so that it’s available without explicitly having to log the user in every time they visit the SPA. It also takes the information about what page the user was on before they were sent to the auth site, and should bring the user back to that page. If done correctly this will feel to the user like they they never really left our application, when in reality our a whole new instance of application was spun up, just through the callback page with some parameters.
- Note that while the front end decodes the token into plain text, it doesn’t bother validating the token since the front end is insecure regardless. It just uses the role information to remove options from the UI that aren’t available and present data back to the user like their username.
- Now that the callback page has made the JWT available to the entire SPA, it can be included with requests to the backend API.
3 Backend (Express):
- When the backend API recieves requests on protected routes it should send them through middleware that does authentication and role checks.
- The auth checking middleware will look for an auth token attached to the request. If it finds one, it should decode it, verify it using the signing key from the issuer / auth provider (Azure AD), and if valid, then make the user information (including roles) available to the rest of the server’s middleware by attaching it to the request. If invalid or not present, it can either return a 401 error to block the request, or let it continue with no user data, depending on your preference.
- The role checking middleware will then take the role information attached to the request (if any), and validate that the role gives them access to the route, and if not, repond with a 401 unauthorized error.
So that’ the rough outline of what we need to do and why, now let’s dive into the practical application of it.
0.4 Wait, What About App Service’s Authentication?

Actually hang on, that seems like a straight forward plan of attack, but in our specific case we had hosted our app on Azure App Service, and we had already enabled Authentication in the App Service’s settings and connected that to our AD. Couldn’t we just use this scheme and get our token from there instead?
The short answer is: no
Medium answer: Maybe / probably, but I couldn't figure it out, and it's probably better not to
Long answer: The stumbling block I kept hitting was that while you should austensibly be able to retrieve a token by sending a GET request to /.auth/me, it returns a json object, and while that object does include role information that supposedly comes from a JWT stored in the id_token property, the id_token is not formatted like a JWT and consequently can’t be verified. I’m not sure why it’s an opaque string, and wasted a lot of time trying to figure out a way of getting it in plain text instead, but could not figure out a way to do it. That being said at the end of the day I’m actually glad this didn’t work out.
0.5 App Service Authorization
While this will be ever so slightly more code heavy then using App Service Authentication, in the long run there’s a number of benefits.
[ Side Note: And I do mean, *slightly, the majority of the coding you’ll have to do is adapting your front end / UX based on the new found role information which you’ll have to do no matter what.* ]
For one, this authentication flow is closer to the actual OAuth2.0 Implicit Grant protocol, and is consequently more agnostic to service and will leave you less locked into hosting / auth providers. If in the future you want to switch your hosting to Netlify or Amazon, or switch your auth provider to OAuth or build your own, this flow will be much easier to replace than going through App Service.
Another real bonus is that it also makes it much easier to develop and debug. Since the /.auth/me endpoint doesn’t exist unless you’re running it on App Service, you have no way of querying it for the token while developing on localhost. By using the normal Auth flow directly to Azure AD, you can test logging in from anywhere your front end is running, including localhost.

|
|
|
|

|

|

|

|

|
So with all that being said, let’s get started adapting our React + Express application to use Role Based Authentication through Azure AD.
1 Configure Auth Provider (Azure AD)
1.1 Create App Registration & Enterprise App in Azure AD
So I said almost completely ignore App Service, and that’s because the one caveat is that we can turn App Service’s auth on briefly to automatically create some app entries in our Azure AD, but then we’ll turn it back off and just use the entries it created.
Your active directory needs two entries for your application, an “Enterprise Application” entry, and an “App Registration” entry. You can find an exhaustive overview of App Registrations and Enterprise apps and their relationship here, but I would honestly just keep going unless you run into problems.
- You can create an app registration and enterprise app manually here and here, or if you already have an Azure App Service instance you can go to
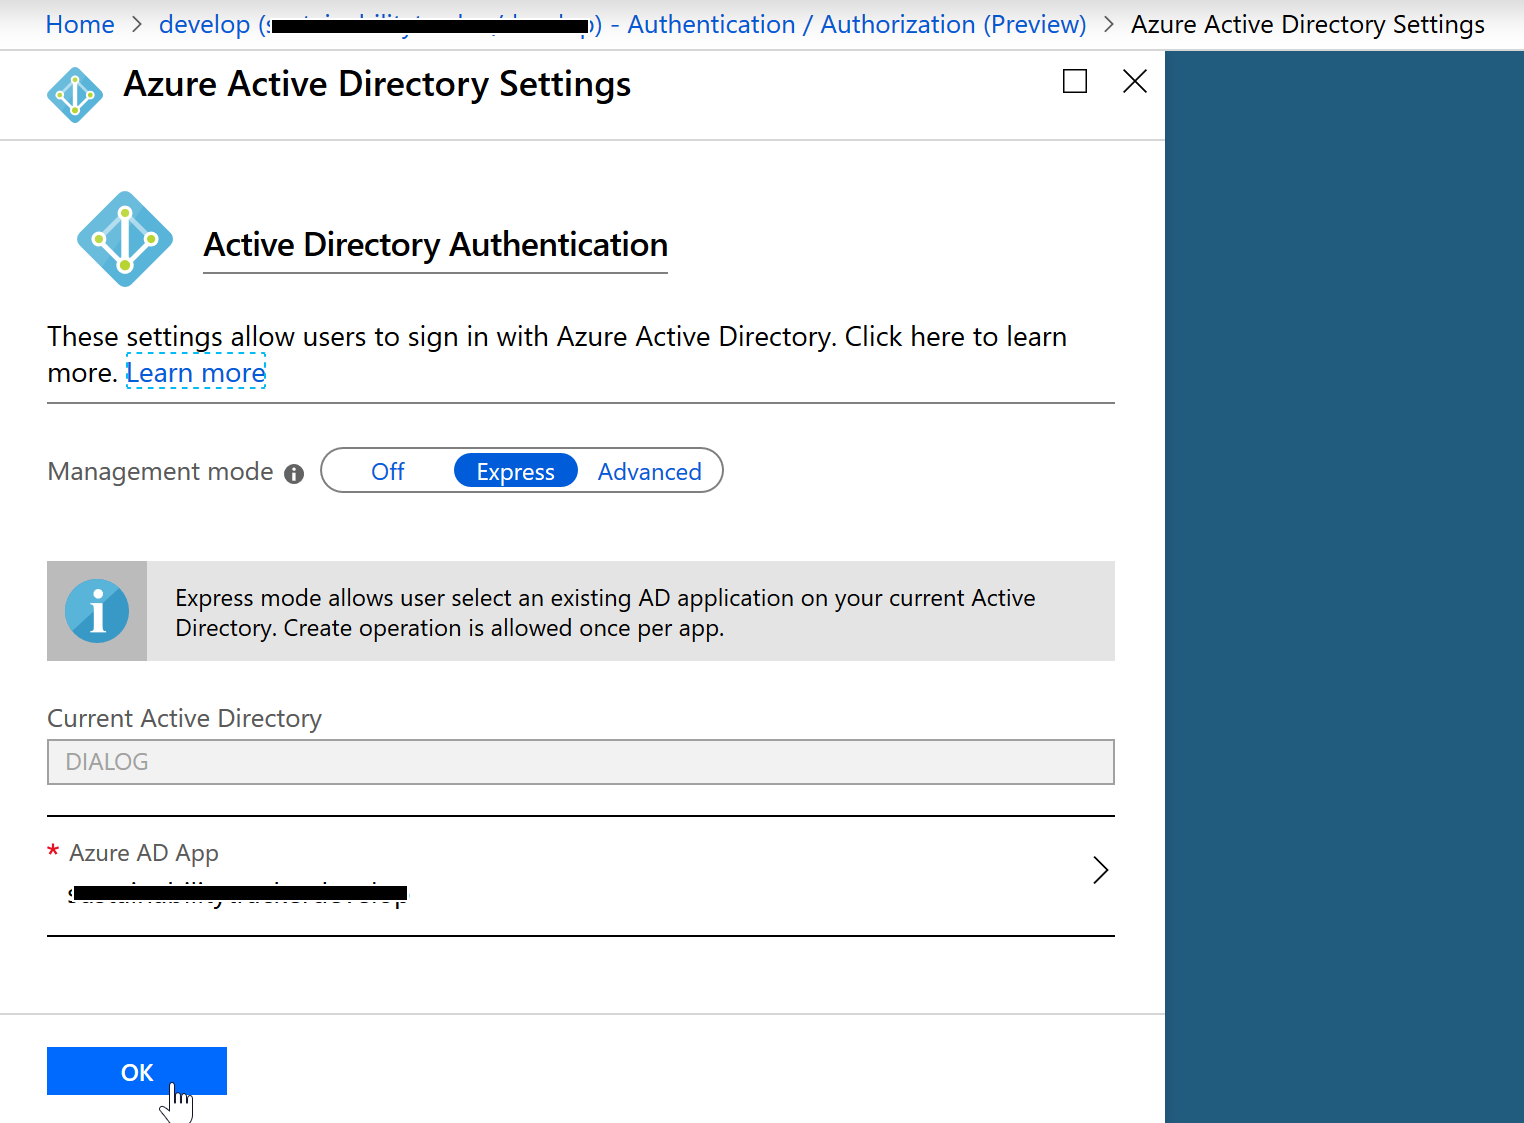
portal.azure.com > App Services > {Your AppService} > Authentication / Authorization (Preview). Here you should turn App Service Authentication On, and then configue Azure Active Directory (yours will say Not Configured if it’s the first time enabling this).
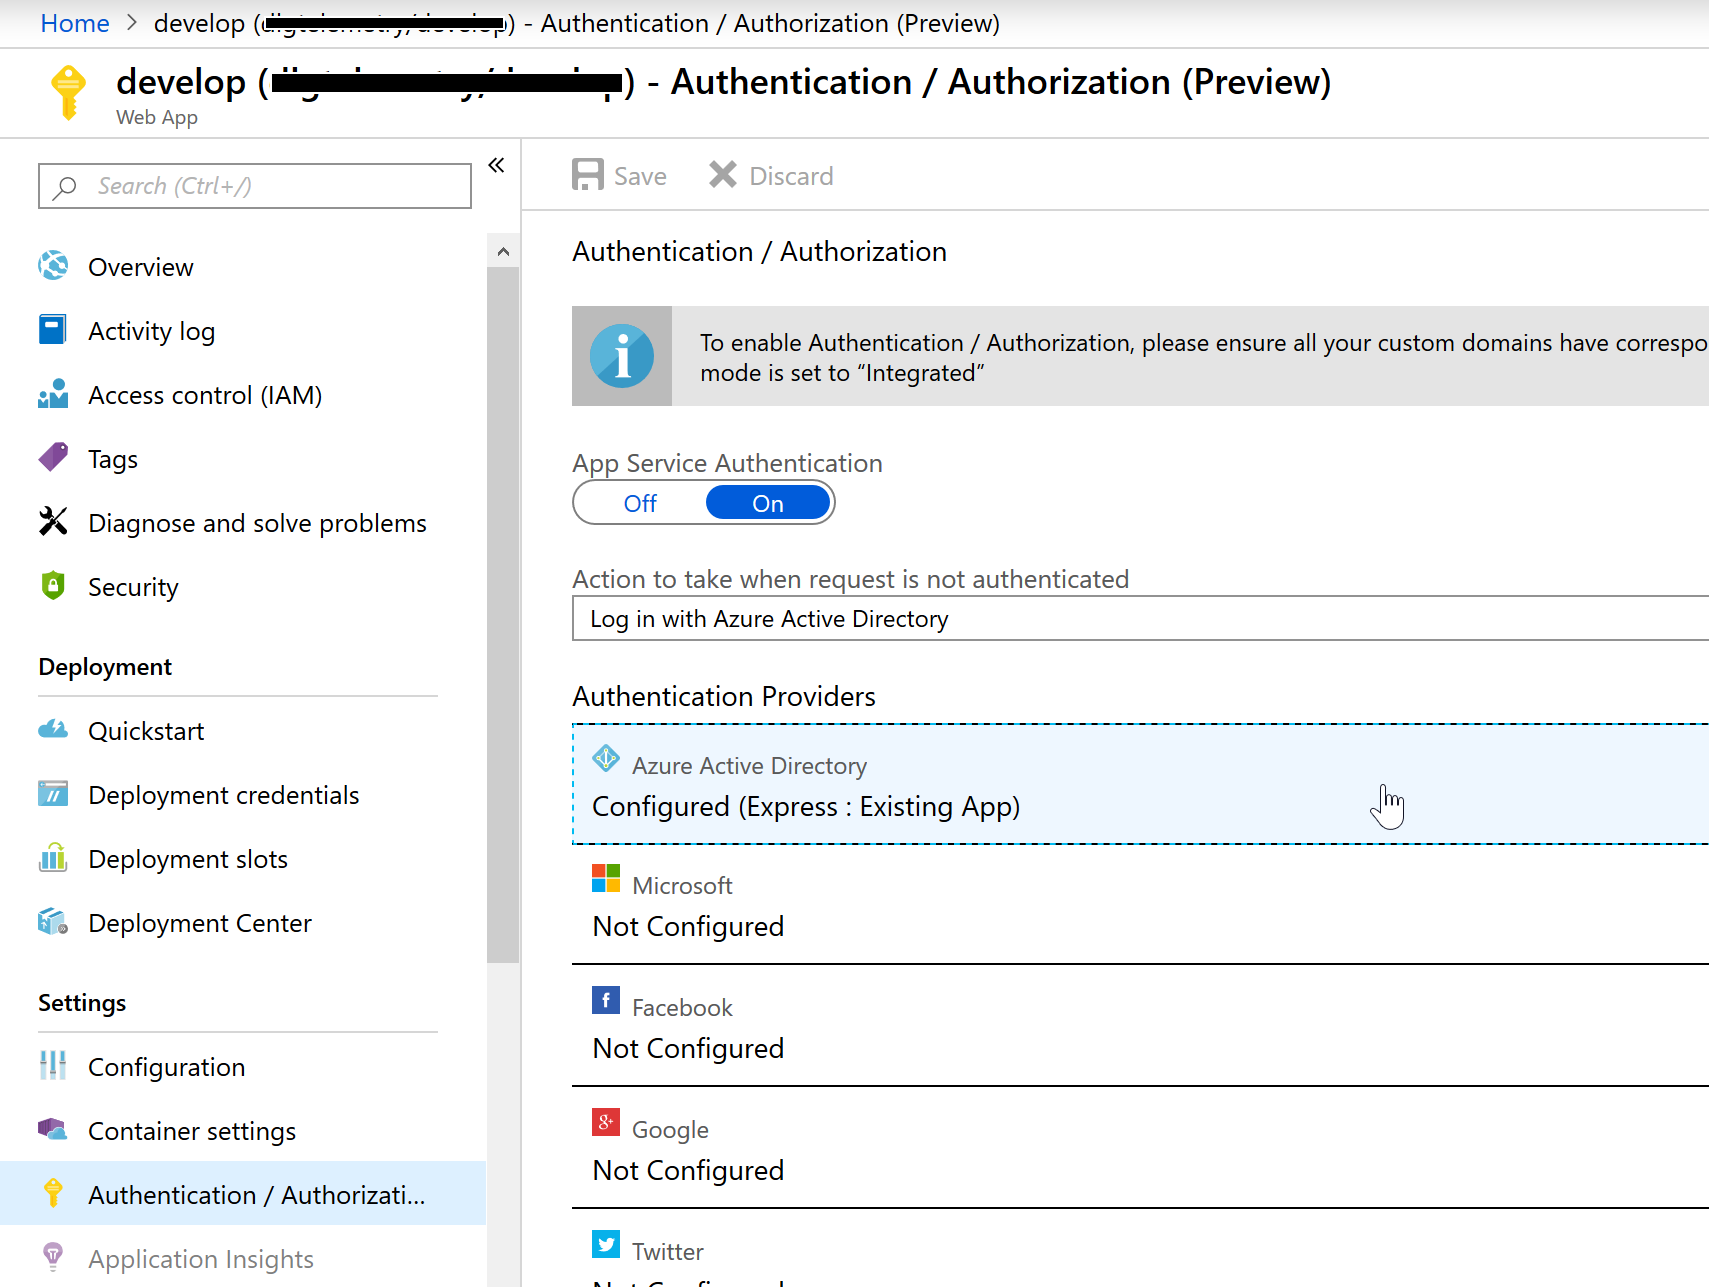
- Here, leave Management mode as “Express” and it should say something like
New App: YourApp, listed underAzure AD App. Just leave this like it is and hit Ok.
- Back on the
Authentication/Authorization (Preview)page hit “Save” to save your changes. - Once it finishes saving, turn App Service Authentication to Off and hit Save. This will have created both an “App Registration” and “Enterprise Application” in our Azure Active Directory and connected them for us.
1.2 Define Roles In App Registration
Defining roles and assigning them is largely taken from here.
- Now navigate to
Azure Active Directory > App Registrations > {Your App}. Note that you may have to search for your app when looking for both App Registrations and Enterprise Applications, I don’t believe there’s a way to browse through a list if there’s more than 50 entries.

- Select Manifest, and if there isn’t already a top level entry in the json file called “appRoles” add the following entries (making sure to generate the necessary GUIDs):
"appRoles": [
		{
			"allowedMemberTypes": [
				"User"
			],
			"description": "For people who can view a list of projects.",
			"displayName": "user",
			"id": "<New GUID>",
			"isEnabled": true,
			"lang": null,
			"origin": "Application",
			"value": "user"
		},
		{
			"allowedMemberTypes": [
				"User"
			],
			"description": "For people who can create projects and manage their own.",
			"displayName": "owner",
			"id": "<New GUID>",
			"isEnabled": true,
			"lang": null,
			"origin": "Application",
			"value": "owner"
		},
]}- Then hit Save.
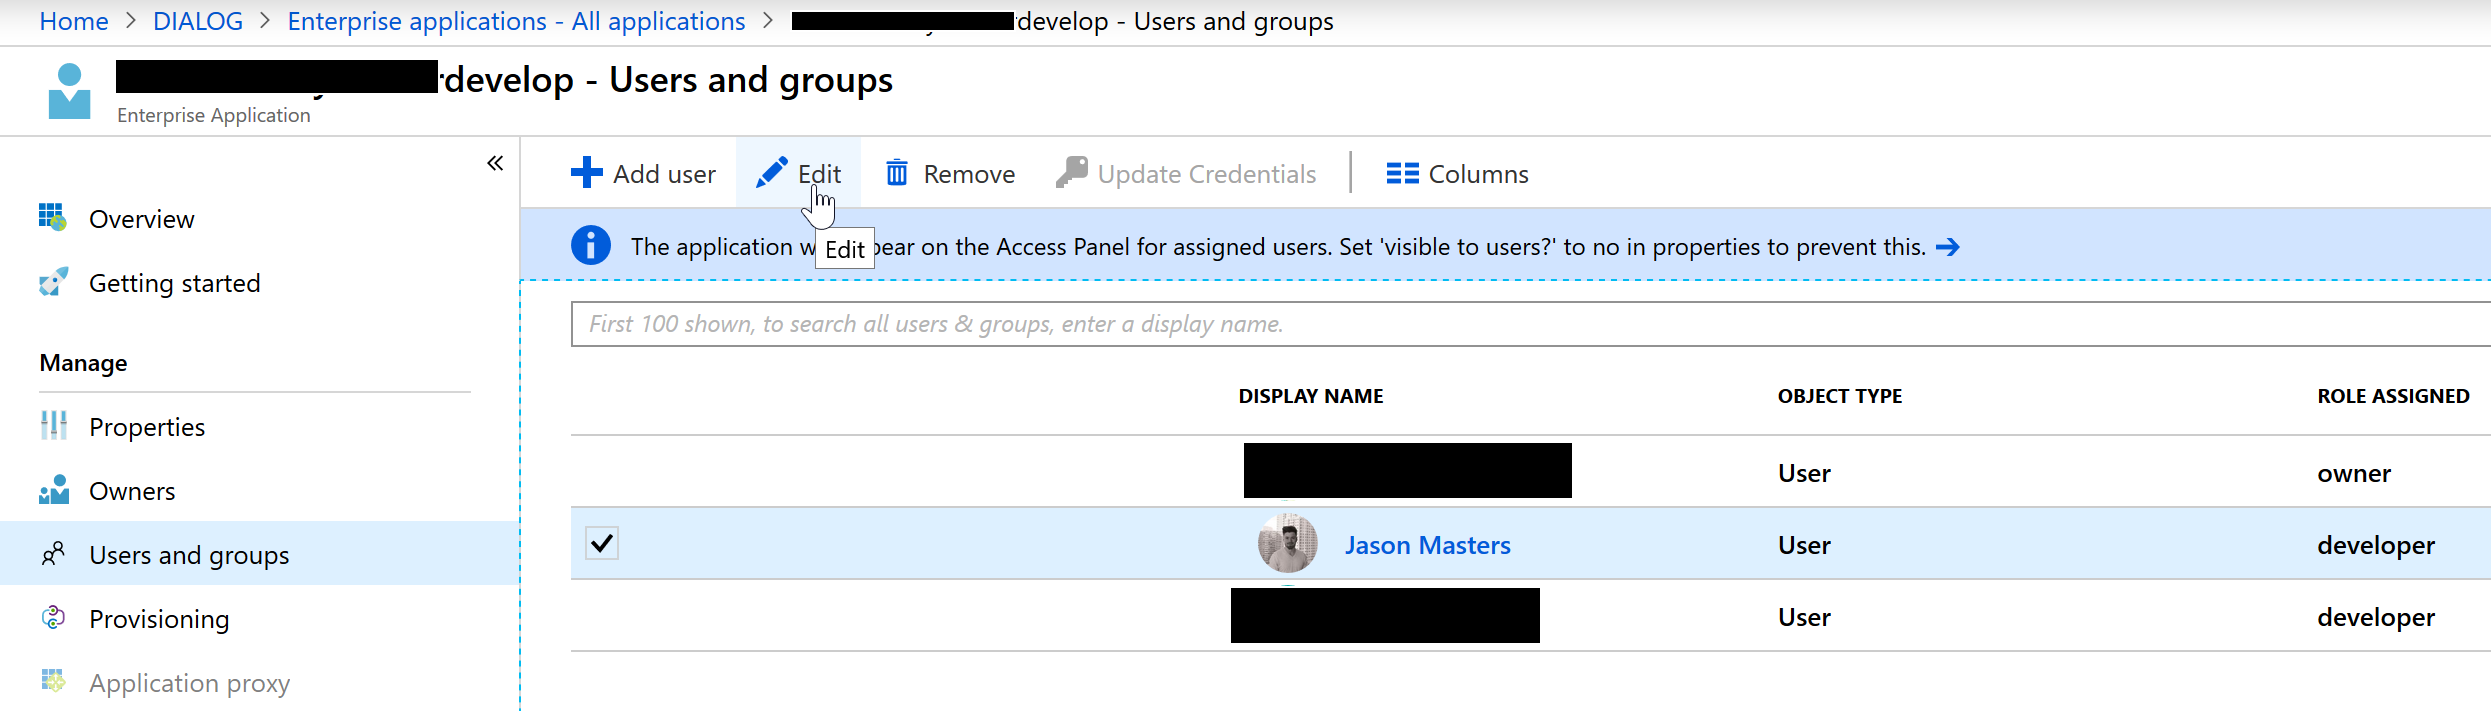
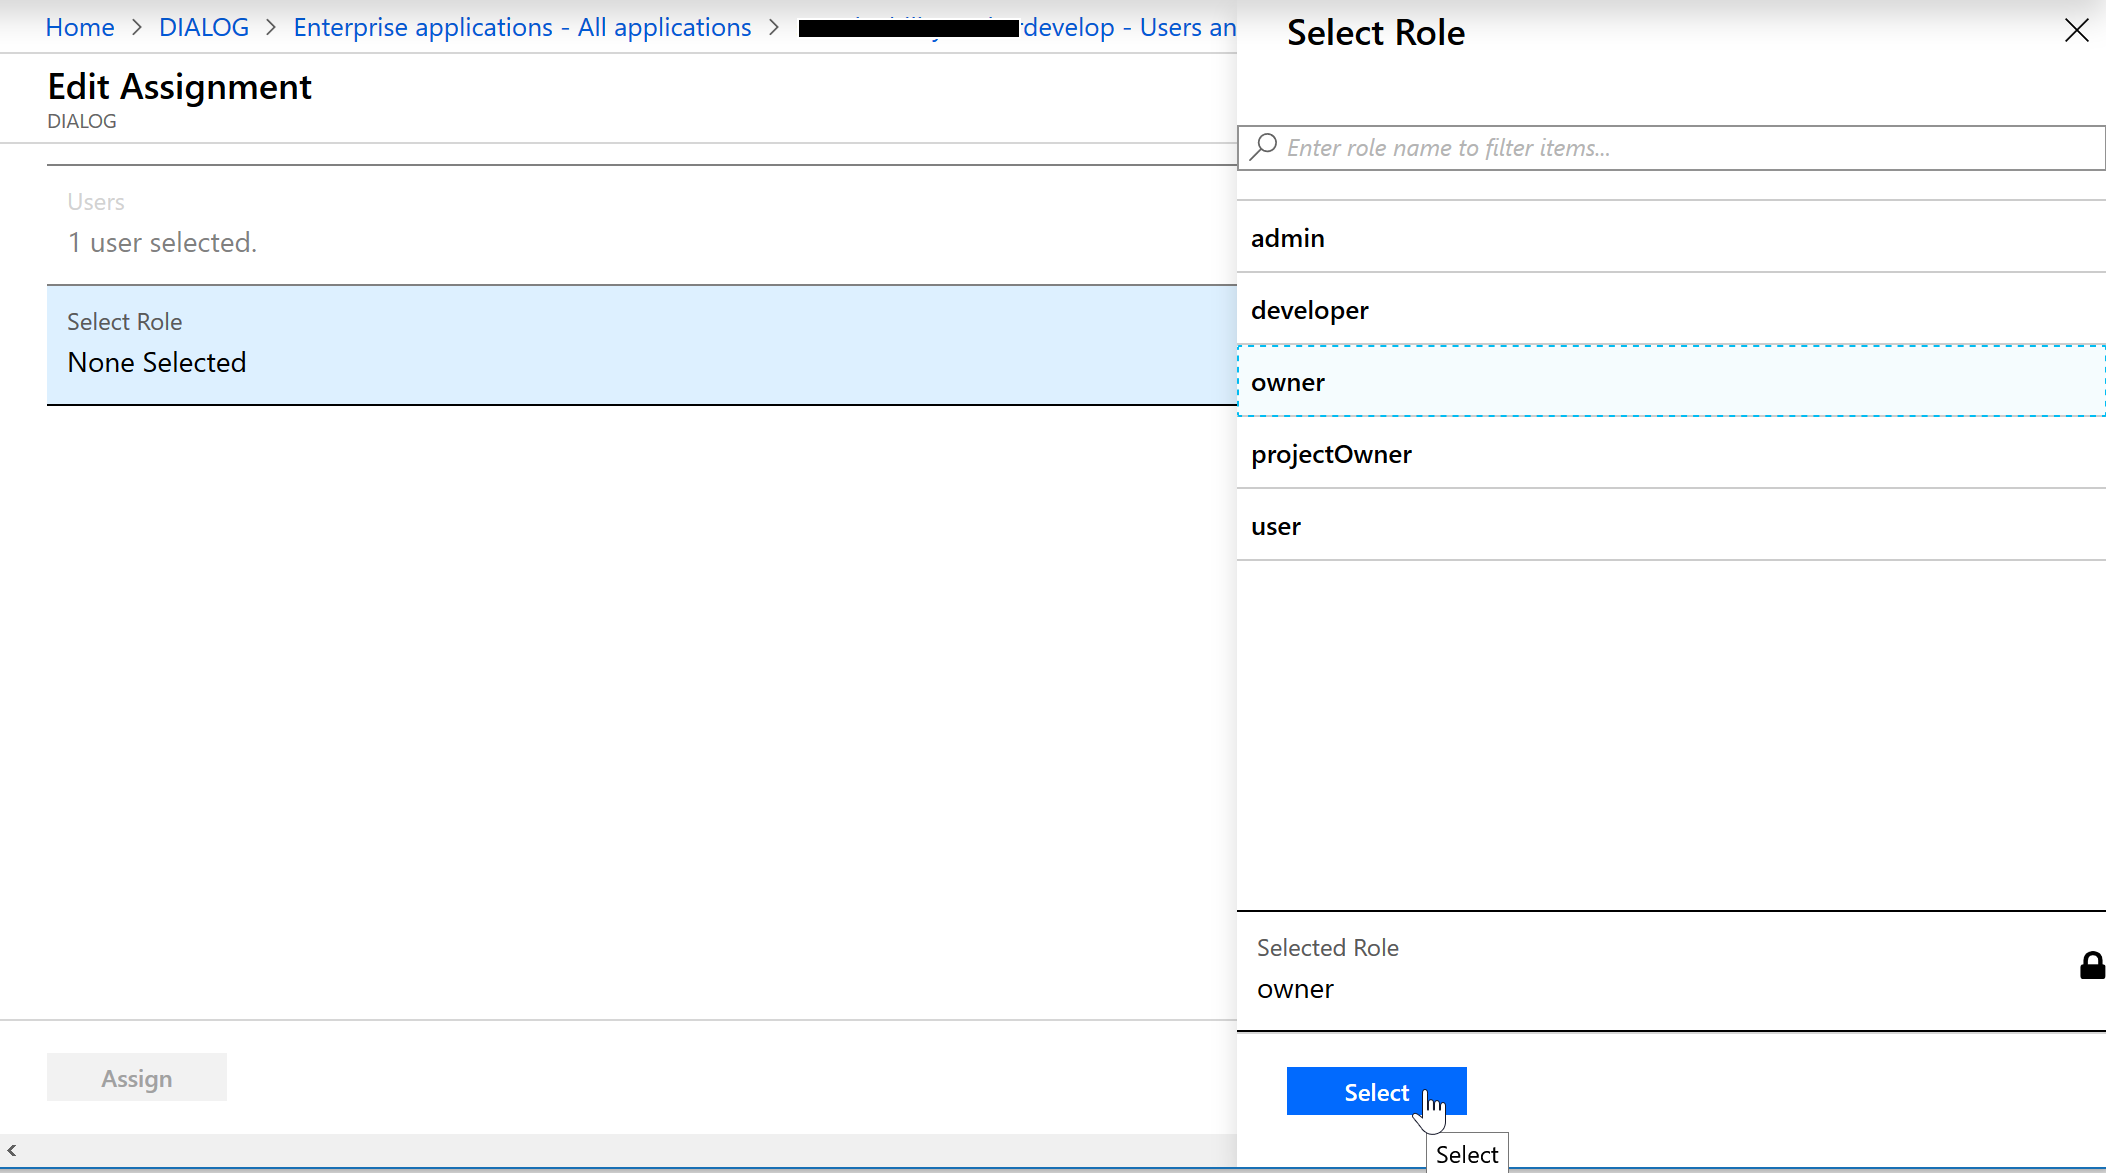
1.3 Assign Users & Roles In The Enterprise Application
- Navigate to
Azure Active Directory > Enterprise applications > {Your App} > Users and groupsand if you aren’t on the list, hit “Add user” and add yourself. Then select your account, and hit Edit.
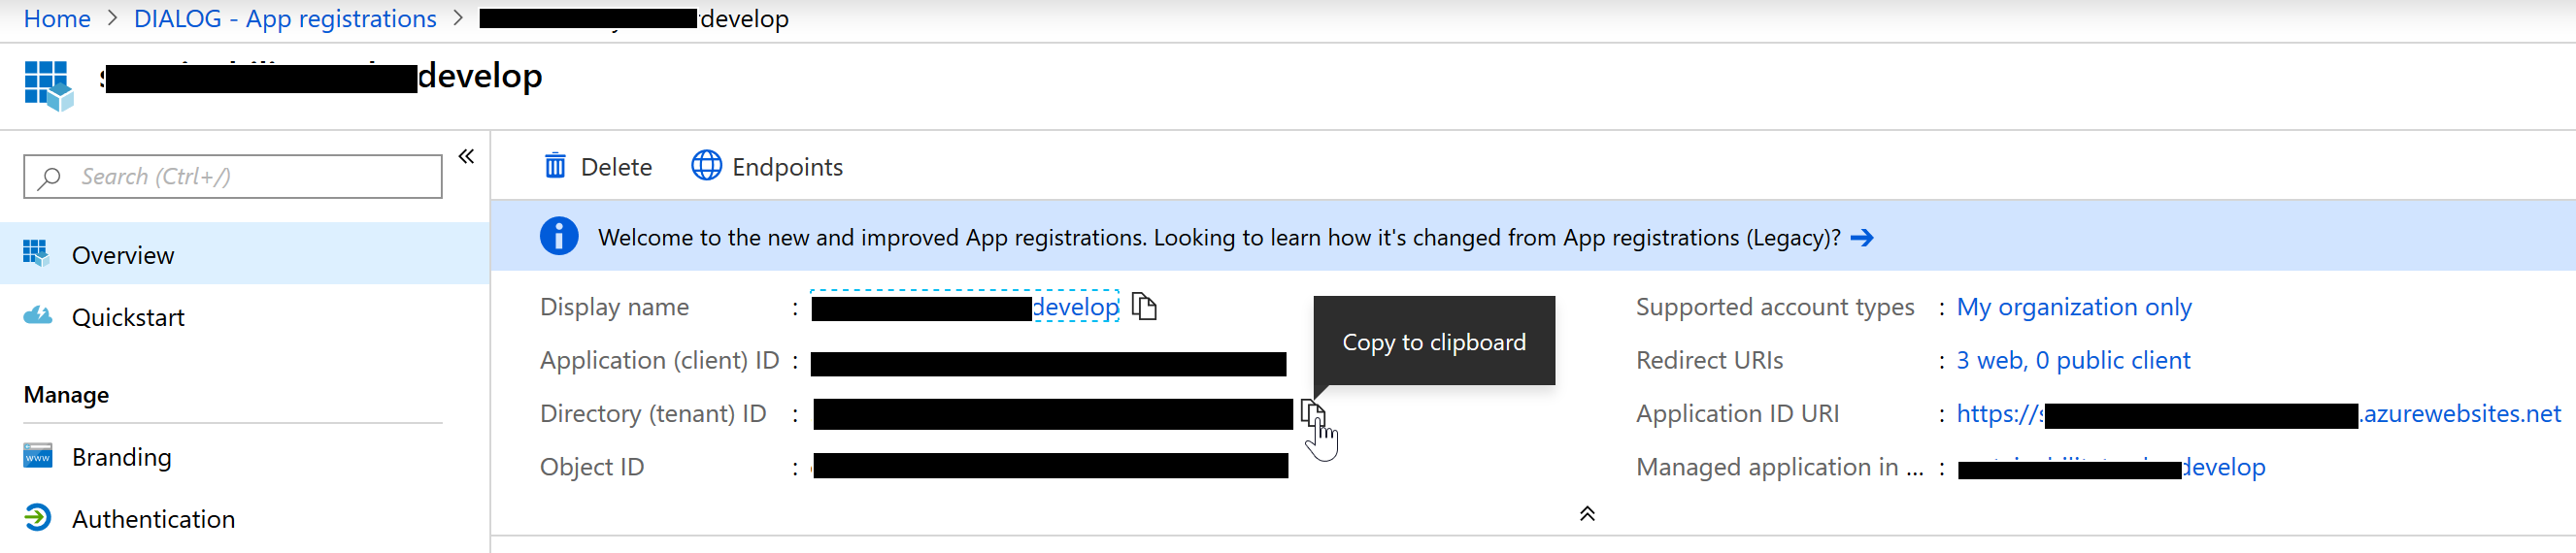
1.4 Get Your Tenant Id and Client Id For Future Reference
Go Azure Active Directory > App Registrations > {Your App} > Overview and copy both the TenantId and ClientId (or just leave this tab open), as you’ll need these two values to know where to connect to in the next two sections:
And that’s it for the auth side!
2 Configure Our Front End Application
Our front end application is largely going to follow this guide which was written for the Auth0 platform. It’s a quite extensive practical guide to securing a SPA. I’m mostly just replacing the Auth.js component, which houses all of the Auth0 stuff so that instead it uses Microsoft’s MSAL library isntead of the Auth0 library. Their guide includes some basic instructions to get a starter app up and running which you can skip if you already have one, but otherwise, you should follow this guide for securing your front end, just with the below modifications to suit Azure (and some final instruction on attaching the token to requests):
2.1 Instead of Auth0, Install the MSAL library
yarn add msal --save2.2 Delete The Auth0 Config File
We’re just gonna put our config stuff in the Auth component instead, though if you want to keep it separate feel free to.
2.3 Replace authContext.js
We’re going to use a slightly modified authContext so paste in the following code:
import { createContext } from "react";
const authContext = createContext({
    authenticated: false, // to check if authenticated or not
    user: {}, // store all the user details
    accessToken: "", // accessToken of user for Auth0
    initiateLogin: () => { }, // to start the login process
    initiateLoginIfCached: () => { }, // to start the login process is cached (i.e. if the user is already logged in.)
    handleAuthentication: () => { }, // handle Auth0 login process
    logout: () => { } // logout the user
});
export const AuthProvider = authContext.Provider;
export const AuthConsumer = authContext.Consumer;
2.4 Replace Their Auth.js component
Replace Auth.js with the following code. Your tenant and client ids are on the overview page of your app registration on Azure.
import * as Msal from 'msal';
import React, { Component } from "react";
import { AuthProvider } from "./authContext";

//switches our redirect uri to local host, though we could get this dynamically instead.
let redirectUri = 'https://<Your App>.azurewebsites.net/callback';
if (window.location.hostname === "localhost" || window.location.hostname === "127.0.0.1") {
    redirectUri = "http://" + window.location.host + '/callback';
}


// Our MSAL config file which we'll use to get our token:
let msalConfig = {
    auth: {
        clientId: '<Your App Client Id>',
        authority: 'https://login.microsoftonline.com/<Your App Tenant Id>/', //tenantId
        redirectUri: redirectUri
    },
    cache: {
        cacheLocation: "localStorage",//keeps login token across sites
        storeAuthStateInCookie: true //stores the auth state in your cache
    }
};

//Our React component
class Auth extends Component {
    //create a new msal instance and store it as a property of this component
    msalInstance = new Msal.UserAgentApplication(msalConfig);


    componentDidMount() {
        //try and get our token from the cache first.
        this.initiateLoginIfCached();
    }

    state = {
        authenticated: false,
        user: {
            role: "visitor"
        },
        accessToken: ""
    };

//tries to aquire the token from the cache and logs in if possible
    initiateLoginIfCached = () => {
        let loginRequest = {
            scopes: ["user.read"] // optional Array<string>
        };
        this.msalInstance.acquireTokenSilent(loginRequest)
            .then(res => {
                this.setSession(res.idToken);
            })
            .catch(err => {
                console.log(err);
            })
    }
//tries to acquire the token from the cache and if fails prompts the user to login.
    initiateLogin = () => {
        let loginRequest = {
            scopes: ["user.read"] // optional Array<string>
        };
        this.msalInstance.acquireTokenSilent(loginRequest)
            .then(res => {
                this.setSession(res.idToken);
            })
            .catch(err => {
                this.msalInstance.loginPopup(loginRequest).then(res => {
                    this.setSession(res.idToken)
                }).catch(err => {
                    console.log(err);
                });
            })


    };

//clears the cached token and sets their state to logged out.
    logout = () => {
        this.setState({
            authenticated: false,
            user: {
                role: "visitor"
            },
            accessToken: ""
        });
        this.msalInstance.clearCache();
        //this.msalInstance.logout(); - this will fully log them out of their microsoft account if you're using localstorage for SSO.
    };

//used when the callback recieves a token and return information
    handleAuthentication = (hash) => {
        console.log('handling auth?')
        console.log(this.msalInstance.deserializeHash(hash))
    };

//this is the method that actually attaches the user data to the Auth component for reuse, and sets the bearer token for our api.,
    setSession(idToken) {
        //console.log(idToken)

        let roles = [];
        if (idToken.claims.roles) {
            roles = idToken.claims.roles;
        }
        const user = {
            id: idToken,
            name: idToken.claims.name,
            roles: roles
        };
        this.setState({
            authenticated: true,
            idToken: idToken.rawIdToken,//this is the raw token that you want to pass to as your Bearer token.
            user: user
        });

    }

    render() {
        const authProviderValue = {
            ...this.state,
            initiateLogin: this.initiateLogin,
            handleAuthentication: this.handleAuthentication,
            logout: this.logout
        };
        return (
            <AuthProvider value={authProviderValue}>
                {this.props.children}
            </AuthProvider>
        );
    }
}

export default Auth;
2.5 Follow The Rest Of The Auth0 Guide.
With our new Auth.js component that connects to Azure through MSAL we can follow the rest of the Auth0 guide, which wraps our React app in the Auth component, provides the code for login and logout buttons, as well as rbac-rules.js which define our roles and permissions, checkRole.js for checking them, and finally the handy Can.js component which will render React components accordingly.
You may find one other difference is that I’ve adapted changeRole.js to changeRoles.js as Azure AD will return an array of roles instead of just a single string. I may have missed some parts of the code that you need to adapt to make this work, but it should be simple enough, just loop through each role and check if any of them have the necessary permissions before returning an error.
2.6 Attach Your Token To Outgoing API Requests
Finally, now that we have our token / user data available to our SPA through AuthConsumers, we need to actually include this token when sending requests to our API. I will leave how you get the token to your fetch requests up to you, personally I have an Api.js object that makes all my fetch requests so I just pass it the token whenever one is retrieved and delete it whenever a user is logged out.
But when making fetch calls, just include the following options:
 fetch(url, {
          method: 'POST',
          body: JSON.stringify(project),
          withCredentials: true,
          credentials: 'include',
          headers: {
            Accept: 'application/json',
            'Content-Type': 'application/json',
            'Authorization': 'Bearer ' + bearerToken,
            'X-FP-API-KEY': 'iphone', //it can be iPhone or your any other attribute
          }
        })
where bearerToken should be the raw id_token from Azure. We can get this from the .user.idToken property of the Auth state which we set, or the res.idToken.rawIdToken property of the response recieved from the msal login / aquire token promises. The point is that we want just the raw token so that the server can decode and validate it for itself.
And that’s it for the front end configuration!
3 Configuring The Backend
Now that our auth provider is configured with users and roles, and our front end is recieving tokens, adapting the UX, and then passing them on, it’s time for our back end to recieve them, decode them, validate them, and protect routes accordingly. The backend configuration is broken into two main parts, checking the authentication, and checking the roles. Checking the authentication was largely taken from the Academind REST API guide though customized for Azure with infromation from here, and checking the roles was largely following the same middleware model but with the same role checking system from the Auth0 front end guide. I’ve compiled these various sources into a single guide for securing an express application below:
3.1 Install jsonwebtoken and jwks-rsa To Your Server
yarn add jsonwebtoken --save
yarn add jwks-rsa --save
3.2 Get The Token From Requests
Create a file called checkAuthMiddleware.js. This will be a piece of Express middleware that checks incoming requests for tokens, validates them, and attaches the parsed user data to the request for subsequent middleware if they’re valid.
const checkAuth = require('./checkAuth');

module.exports = async (req, res, next) => {
    let decodedAndVerified = null;
    try {
        var auth = req.headers.authorization;//get the Authorization header from the incoming request

        let idToken = auth.substring(7);//removes "Bearer " from the Authorization header
        let result = await checkAuth(idToken); //await the result of our authentication check
        if(!result){
            throw Error("Invalid token.")
        }
        req.userData = result;//assuming no error was thrown and we recieved a token, it should be valid so let's attach it for future middleware
        next();
    }
    catch (err) {
        console.log(err)
        return res.status(401).json({//if an error occurred just respond with an unauthorized response.
            message: 'Auth failed'
        })
    }
}
3.3 Validate The Token
You may have noticed that there is no checkAuth.js file referenced in the above, so let’s create it and paste in the following code:
const jwt = require('jsonwebtoken');
const jwksClient = require('jwks-rsa');

//getSigningKey is an asynchronous function that uses callbacks, this just turns it into a promise.
//it's probably unnessecary but I'm more comfortable with promises and they let us use async/await.
function getSigningKeyPromise(kid, client) {
    return new Promise((resolve, reject) => {
        try {
            client.getSigningKey(kid, (err, key) => {
                try {
                    if (err) {
                        reject(err);
                    }
                    const signingKey = key.publicKey || key.rsaPublicKey;
                    resolve(signingKey);
                }
                catch (err) {
                    reject(err);
                }
            });
        }
        catch (err) {
            reject(err);
        }
    });
}

//this function will actually check the JWT idToken to see if it's valid,
module.exports = async (idToken) => {
    let decodedAndVerified = null;

    //first decode the jwt
    let parsed = jwt.decode(idToken, { complete: true });

    //get the unique id of the signing key
    let kid = parsed.header.kid;

    //the signing key will be stored in a Json Web Key Set (basically just a list of signing keys, this will point our client at Microsot's key set)
    const client = jwksClient({
        strictSsl: true, // Default value
        jwksUri: 'https://login.microsoftonline.com/common/discovery/keys',
        requestHeaders: {}, // Optional
        requestAgentOptions: {} // Optional
    });

    //this will reach out and try to get the signing key from the key set based on the unique id
    let signingKey = await getSigningKeyPromise(kid, client);

    //once found it will verify the token with that signing key
    decodedAndVerified = jwt.verify(idToken, signingKey);
    if (!decodedAndVerified) {
        throw Error("verification returned null");
    }

    //if everything passes this is where you should verify that it was issued by the expected tenant id / client id / application by checking the claims and comparing them to your Azure AD App Registration. At this point it's still possible that the token was created by a different Azure AD tenant, we've technically just verified that it was signed by microsoft and everything inside is true, we don't yet know that it was issued by our authentication application specifically. But there will be a claim inside the token that indicates the ids of the tenant / app registration that we can double check.

    //if everything has gone to plan, our JWT is valid and we can safely return the decoded version.
    return decodedAndVerified;
}
Note that you’ll still have to add in a check to verify that it was issued by your application specifically and not by some other Azure application.
3.4. Protect The Routes For Login
Now when we look at our Express routes, we just have to add that checkAuthMiddleware as the first step of a protected route to make sure a user is logged in:
const checkAuth = require('../auth/checkAuthMiddleware');

router.get('/projects',
  checkAuth,//check for
  (req, res) => { projectService.get(req, res); }
);
3.5 Create rbac-rules.js and checkRole.js on your server
From the front end section, copy over the same rbac-rules.js and checkRoles.js files into your back end.
3.6 Add Role Checking Middleware
Create checkRolesMiddleware.js and copy in the following:
const checkRoles = require('./checkRoles');

module.exports = (req, res, next, permission, data) => {
    let roles = [];
    let userData = req.userData;
    try {
        if (!userData || !userData.roles) {
            throw Error("no userData or roles");
        }
        if(!checkRoles(userData.roles, permission, data)){
            throw Error("role check failed");
        }
        req.userData = userData;
        next();
    }
    catch (err) {
        console.log(err);
        res.status(401).json({
            message: 'Auth failed'
        });
    }
    //if none of the roles have granted permission yet then they're not allowed in.
};
3.7 Protect Routes With Roles
Now on your route, just add the role checking middleware as the next step after authorization, with the permission name for that API route:
const checkAuth = require('../auth/checkAuthMiddleware');
const checkRoles = require('../auth/checkRolesMiddleware');

router.get('/projects',
  checkAuth,//check for a valid token from our auth provider
  (req, res, next) => checkRoles(req, res, next, "projects:get", ""),//if the token included role information check to see if one of their roles grants them permission to this route.
  (req, res) => { projectService.get(req, res); }//if so continue processing the request.
);
AND YOU’RE DONE!
That’s it, you should now have users and roles defined and configured in your Azure AD, a React front end that can gracefully redirect users to get logged in and adapt it’s UX accordingly, and an Express back end that can protect routes based on your users and their roles.
Please feel free to leave a comment below or reach out to me directly if you have any ideas for improvement, bugs in the code, or questions about any of the above!